- Aromatherapy (36)
- Benefits of Yoga (282)
- Home Remedies (1087)
- massage therapy (9)
- Preventive Therapy (135)
- Running (41)
- Skin Care (15)
- Stress Relief (25)
- Stretching (5)
- walking (33)
- Womens Health (14)
- Yoga Benefits for Pregnant Women (16)
- Yoga Benefits for Students (3)
- Yoga for Children (11)
- Yoga for Holistic Living (37)
- Yoga for Midlife Crisis (3)
- Yoga for Senior Citizens (2)
- Yoga for the Workplace (1)
- Yoga Health Tips (185)
- Yoga Practice during Menstruation (5)
Firefly Pose (Tittibhasana) For Maintaining Body Balance
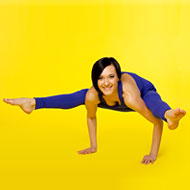
Tittibhasana An Advanced yoga pose: What is firefly pose, how many postures involved in it
Tittibhasana (Firefly Pose) is considered an advanced Yoga pose in the arm balancing section. In this pose your body resembles an insect in flight and hence the name. This is a highly dynamic pose that helps open up the back part of your body with particular emphasis on the hamstrings and spine. It helps strengthen your wrists and arms, as well as your abdominal muscles. This Yoga pose is also very beneficial for those wishing to improve their equilibrium or sense of balance as well as mental abilities, such as focus and concentration. However, it can prove to be a rather demanding or even complicated pose, as it calls for a good deal of stamina and harmony in executing it, with a certain amount of grace and finesse.
Like all other Yoga postures the Tittibhasana (Firefly Pose) pose is not designed for individual practice or as an exercise by itself. Yoga asanas (poses) are supposed to be practiced in a flowing sequence, with one pose blending with and melting into another, even if you take small breaks in between. For anyone intending to derive the best benefits, this is the only way to do the asanas (poses). Of course, certain postures – such as the meditative ones – are standalone asanas (poses), but the rest are best practiced together and in a particular sequence. Here are certain asanas (yoga poses) you might want to consider doing before or after Tittibhasana (Firefly Pose), in the context of this pose.
Before:
Baddha Konasana (Bound Angle Pose)
- Bakasana (Crane Pose)
- Garudasana (Eagle Pose)
- Malasana (Wide Legged Squat)
After:
Adho Mukha Svanasana (Downward Facing Dog Pose)
- Urdhva Mukha Svanasana (Upward Facing Dog Pose)
- Uttanasana (Standing Forward Bend)
Instructions:
- Start your practice from the Malasana (Wide Legged Squat)
- Keep your feet one to one and a half foot apart, more than hip width, your hands on your mat in front of you.
- Hold both feet with your hands, work their way behind you, and try to reach your shoulders from under your knees, rising up a little.
- Next, squat down on your mat and, very gradually, carry your body weight onto your hands.
- Now, lift both feet off the mat and position them in front of you. When you are comfortable enough, straighten them out fully. As you do this, see that you press your thighs inwards and squeeze them against your upper arms.
Remember, this is an advanced pose so, don’t attempt it unless you are experienced enough and never without proper guidance. Also, avoid this pose if you are suffering from any back, wrist or shoulder injuries.
« Previous blog Kapalabhatti Yoga: Benefits of Standing And Seated Postures
Next blog » Headstand Yoga: A Strict No For Blood Pressure Patients
ADVERTISEMENT
Related Questions
- RSS Feeds -
- All posts
- All comments
Related Articles
- Arm Strengthening Workouts Working out your arms should be part of any fitness training program. You use...
- Yoga To Stay Fit Physically For several thousand years, Yoga has been flaunted for being able to help bal...
- Balance Exercises For Vertigo Vertigo is a very dangerous condition for a person to suffer from. This is be...
- Yoga For Cyclists Most cyclists need specific exercises to alleviate their muscle tightness tha...
Categories