- Raja yoga
- Yoga Stretches
- Jivamukti Yoga Poses
- Yoga Tree Pose
- Sun and Moon Yoga
- Wind Removing Pose
- Hare Pose
- Accomplished Pose
- Urdhva Mukha Pinch Mayurasana
- Revolved Abdomen Pose
- Raised Foot Pose
- Scorpion Pose
- Butterfly Pose
- Half Tortoise Pose
- Revolved Twist
- Balancing Stick Pose
- Cat Pose
- Supported Shoulderstand
- Crane Pose
- Happy Baby Pose
- Firefly Pose
- Scale Pose
- Side Plank Pose
- Upward Facing Two-Foot Staff Pose
- Reclining Big Toe Pose
- Stick Pose
- Revolved Head-to-Knee Pose
- Full Boat Pose
- Upward Extended Feet Pose
- Yoga arm balance poses
- Core Yoga
- Inversion Yoga Poses
- Seated And Twist Yoga
- Horse Pose
- Cobbler Pose
- Seated Wide Angle Pose
- The Compass Pose
- Half Crow Pose
- Bound Half Moon Pose
- Lotus Pose
- Reverse Warrior Pose
- Fixed Firm Pose
- Back-bend Poses
- Forward bend Poses
- Sarvangasana
- Ashtanga Yoga Poses
- Warm up poses
- Seated Poses
- Seated Forward Bends
- Chair Poses
- Standing Poses
- Standing Balancing poses
- Yoga Asanas
- Hatha Yoga Asanas
- Yoga Postures Online
- Partner Yoga Poses
- Anusara Yoga Poses
- Advanced Yoga poses
- Restorative Yoga Poses
- Kids Yoga Poses
- Beginning Yoga Postures
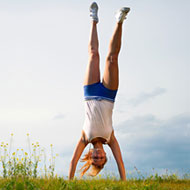
Handstand (Adho Mukha Vrksasana)
In yoga, the Adho Mukha Vrksasana is also known as, the handstand pose or the tilted tree pose. In this yoga asana, solely the hands support the entire weight of the body.
Although this is not a very easy asana for beginners, they can master it with regular practice. It is therefore advisable that beginner’s practice this asana under the guidance of a trained yoga expert so that falls and injuries are avoided.
Related Articles

Related Blogs
Related Topics
Yoga Questions
Continued...
The anatomical focus points of this yoga handstand are the pituitary, brain, shoulders, arms, wrists, legs, lungs and the spine. This full arm-balancing pose is very helpful in opening up the shoulders and developing wrist and arm strength. Both adults as well as kids can perform this posture. However, while performing this handstand kids should always be supervised by adults or trained teachers who can teach them the right technique to get into this posture.
Steps :
Some of the important handstand tips to keep in mind for both adults and children are as follows:
- Try to practice this pose against a wall in the beginning so that you get the body positioning right and learn to balance without falling.
- Get a good kick up to get into this posture.
- Keep the fingers spread wide apart on the floor so you get a good grip for this position.
- Lock your elbows well so that you can support the weight of your entire body.
- Keep your legs and butt tight with the toes pointed upwards.
By following these simple tips, you can master this yoga posture with regular practice.
In the basic Adho Mukha Vrksasana or handstand, you have to hold the body straight with the legs extended upwards and the hands stretched out to support the body weight. The basic handstand steps for performing this asana are as follows:
- First, get into the Adho Mukha Svanasana or the downward-facing dog pose with your fingertips a few inches away from a wall and your hands at shoulder width. Keep your palms open and flat on the mat or floor with the fingers spread out wide.
- While exhaling normally, start bending your knees slowly and lift up your legs so that you are balancing on the toes. This will prepare you to bounce upwards.
- While inhaling, jump gently and raise both the legs up from the ground, in such a way, that the whole weight of the body is now solely on the hands. Your hips may arch over the shoulders while doing this.
- While keeping the arms straight, bring the back of the pelvis and the soles of the feet on to the wall. The weight of the body should be pressing down on the palms.
- While exhaling, stretch out the legs upwards against the wall, while looking down towards the nose.
- Hold this pose for at least 5-10 complete breaths and then release slowly.
Precautions :
Since this asana is not very easy to perform, especially for beginners, a few handstand precautions to keep in mind. These handstand postures requires good arm balance and therefore to begin with, practice with the support of a wall to avoid toppling over and getting hurt.
Practice this posture only 3-4 times initially, until shoulder strength increases.
- Pregnant and menstruating women should avoid performing this asana completely.
- People who have existing shoulder, back and neck injuries or suffer from problems like high blood pressure, heart problems and headaches should also avoid this asana.
Beginner’s Tips :
It is difficult for most beginners to keep their elbows straight while performing this posture and therefore, they can try buckling a strap and looping it over the upper arms, just above the elbows. Extend the arms outwards and at shoulder width and adjust the strap to fit snugly around the outer arms. This beginner’s tip for handstand will help you perform this posture in a better and easy manner.
Benefits To Body Parts :
- It strengthens the arms, wrists as well as the shoulders, making them more agile and flexible.
- It helps in increasing stamina and overall body balance.
- It improves circulation of blood in the entire body.
- It stretches the abdominal muscles and is therefore beneficial in reducing tummy fat when practiced regularly.
Besides the physical benefits of this asana, one of the main therapeutic applications of the handstand pose is that it calms the brain and can effectively help relieve mental stress and mild depression. There are other variations for this pose, which also have a number of health benefits.
Variations :
Half Headstand Pose (Ardha Adho Mukha Vrksasana) is one of the most common variations for the handstand pose. The steps to perform this variation pose are as under:
- Beginning on the hands and knees, rock the weight of your body forward while bringing your forearms to the mat and lifting the hips.
- Keep the fingers interlocked, palms open and place them in front of you. The body weight should be evenly distributed on the feet, shins and forearms.
- While rolling the body forward, place your head in the palms of your hands while pressing the shoulder blades down and slightly away from the ears.
- Lengthen the spine rounding it to the tip of the tailbone so that all the body weight presses into the forearms.
- Now curl the toes and lift the hips off the floor so that the body is in an inverted v-like position. Continue to elongate the body towards the ceiling and remain in this posture for at least 1-2 minutes. This completes the half headstand pose.
Preparatory Poses :
- Downward Facing Dog Pose (Adho Mukha Svanasana)
- Crane Pose (Bakasana)
- Mountain Pose (Tadasana)
- Standing Forward Bend (Uttanasana)
- Hero Pose (Virasana)
- Reclining Hero Pose (Supta Virasana)
Follow Up Poses :
Similarly, follow up poses for the handstand include- Head Stand (Sirsasana)
- Feathered Peacock Pose (Pincha Mayurasana)
It is advisable to do all these asanas under professional supervision to avoid neck, back and shoulder injuries.
Handstand