- Raja yoga
- Yoga Stretches
- Jivamukti Yoga Poses
- Yoga Tree Pose
- Sun and Moon Yoga
- Wind Removing Pose
- Hare Pose
- Accomplished Pose
- Urdhva Mukha Pinch Mayurasana
- Revolved Abdomen Pose
- Raised Foot Pose
- Scorpion Pose
- Butterfly Pose
- Half Tortoise Pose
- Revolved Twist
- Balancing Stick Pose
- Cat Pose
- Supported Shoulderstand
- Crane Pose
- Handstand
- Firefly Pose
- Scale Pose
- Side Plank Pose
- Upward Facing Two-Foot Staff Pose
- Reclining Big Toe Pose
- Stick Pose
- Revolved Head-to-Knee Pose
- Full Boat Pose
- Upward Extended Feet Pose
- Yoga arm balance poses
- Core Yoga
- Inversion Yoga Poses
- Seated And Twist Yoga
- Horse Pose
- Cobbler Pose
- Seated Wide Angle Pose
- The Compass Pose
- Half Crow Pose
- Bound Half Moon Pose
- Lotus Pose
- Reverse Warrior Pose
- Fixed Firm Pose
- Back-bend Poses
- Forward bend Poses
- Sarvangasana
- Ashtanga Yoga Poses
- Warm up poses
- Seated Poses
- Seated Forward Bends
- Chair Poses
- Standing Poses
- Standing Balancing poses
- Yoga Asanas
- Hatha Yoga Asanas
- Yoga Postures Online
- Partner Yoga Poses
- Anusara Yoga Poses
- Advanced Yoga poses
- Restorative Yoga Poses
- Kids Yoga Poses
- Beginning Yoga Postures
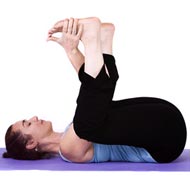
Happy Baby Pose (Ananda Balasana) - Steps, Tips, Precautions And Health Benefits
Ananda Balasana (Happy Baby Pose) is considered to be a forward bend as well as a core exercise. The Happy Baby Pose is very effective in bringing about relaxation by making the mind calm.
By performing some gentle stretches in the pose before going to bed, you will feel the tension being released from your hips and lower back, making you feel a lot more relaxed.
Related Articles
Related Blogs
Related Topics
Yoga Questions
Continued...
When performing the Ananda Balasana (Happy Baby Pose) as part of your yoga routine, you should give support to your neck by using props like a folded blanket. While the Happy Baby Pose in yoga is considered to be good for advanced practitioners as well as beginners, keeping a blanket between your head and shoulders will help you perform the pose better.
Steps :
- You can begin the Happy Baby Pose by first coming into the lying position on your back. While breathing deeply, you should let your knees fold and bring them to press into your belly.
- Take a deep breath, and with your hands hold onto the outside part of your feet. If you find it difficult to hold your feet with your hands, you could make use of a belt or a scarf that goes over each instep. Bring your knees to widen more than your torso and let them be pushed to your underarms.
- Let each ankle be placed above each knee, so that your shins make a right angle to the ground. Through both your heels, without using too much effort, flex and let your feet be thrust into your hands (or belt or scarf). Let your hands be pulled down so that a resistance is created.
- Your thighs should be brought in towards your body, and your tailbone should be pushed down towards the mat as your spine is stretched. Your pelvis should be released towards the mat and your skull’s base should be stretched away from the neck. Make sure that at all times that your hips do not come off the mat. To ensure this, you could let your lower back and tailbone press into the mat.
- This pose can be held for 30–60 seconds. To get out of the pose, you should breathe out, let your feet be released, and place them on the mat. Once you complete the happy baby pose steps you can relax for a few breaths.
Precautions :
- Just like with all yoga postures, you should make sure to perform the Happy Baby Pose correctly and take certain precautions to avoid injury or make an injury worse.
- Avoid this pose during pregnancy and if you have a knee injury.
- If you have a neck injury, you should make use of a thickly folded blanket to provide support to the head.
- Another precaution you should take when performing this pose is to make sure that the spine is straight.
- This precaution is important because if there is a curve in the back in either direction your spine can be injured.
- This pose can also become an inversion that is mild. Therefore, a student who is in the moon cycle should avoid practicing this posture or if he or she has high blood pressure.
Beginner’s Tip :
When performing this pose, you may be tempted to press your lower back to the floor and let your tailbone round towards the ceiling. However, you should make sure that your tailbone is pressed to the ground and try to find place between the floor and your lower back. When you keep your tailbone down, the hip flexicon will be increased in the pose. A beginner’s tip for the Happy Baby Pose is to hold the feet with a yoga strap that is looped round the middle arch if there is difficulty in holding the feet directly with the hands.
Benefit To Body Part :
- Being a good hip opener, it needs the strength of the arms, instead of allowing gravity to do the work. Hence, this pose comes under the poses that work with arm flexion or help to make the biceps strong.
- The pose helps release tension from the area of the lower back.
- As mentioned earlier, it helps open the hips, shoulders, and chest.
- The pose also helps stretch the inner groin, spine, back, inner thighs, and hamstrings in a gentle manner
- It provides deep compression of the stomach.
- It relaxes the sacrum.
Squatting is a very good way to improve the health of the pelvic floor. If you are not able to perform a squat while you are upright you can try out this pose as it is basically squatting in the lying position. This makes it easier to stretch the hips in a safe manner. It usually happens that beginners get tired and stop pulling the feet during the performance of the pose. However, it is alright because by that time the legs weight will be enough to make the pose work. This pose can be beneficial for athletes before starting any workout or training. This is because it gives an easy stretch to the inner thigh without putting any stress on the back.
Therapeutic Applications :
- The Happy Baby Pose helps in bringing relief from fatigue and stress, not only to the body but also the mind.
- Performing this pose also helps in bringing down the rate of the heart, bringing relaxation and calmness to the mind.
However, to experience the benefits, it is essential that you practice the pose on a regular basis.
Variations :
- You could practice it against a wall or make use of a belt to hold onto the feet. The back of the thighs could also be held onto if there is difficulty in holding the feet with the hands.
- Another variation for the Happy Baby Pose is to let the hands be clasped under the knees.
Preparatory Poses :
- Hero Pose (Virasana)
- Child Pose (Balasana)
Follow Up Poses :
- Downward Facing Dog (Adho Mukh Svanasana).
Happy Baby Pose