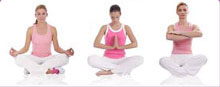
- Sun Salutation
- Headstand
- Inverted Triangle Pose
- Hand to Foot Pose
- Lion Pose
- Head to One Knee Pose
- Head to Knees Pose
- Camel Pose
- Sage Marichi Twist Pose
- Half Lord of the Fish Pose
- Inverted Leg Stretch Pose
- Shoulder Stand
- Plough Pose
- Inclined Plane
- Boat Pose
- Fish Pose
- Wheel Pose
- Bridge Pose
- Downward Facing Dog Pose
- Cobra Pose
- Bow Pose
- Locust Pose
- Eagle Pose
- Peacock Pose
- Crow Pose
- Corpse Pose
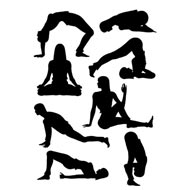
- Yoga Balance Asanas
- Yoga Asanas For Spine
- Yoga Asanas in Chair
- Basic Yoga Asanas For Stomach
- Yoga Asanas For The Neck
- Yoga Asanas For Depressed
- Yoga Asanas For Beginners
- Sequencing Yoga Asanas
- One Legged King Pigeon Pose - Eka Pada Rajakapotasana
- Reclining Bound Angle Pose - Supta Baddha Konasana
- Eight Angle Pose - Astavakrasana
- Hand Clenching
- Side Crane Pose - Parsva Bakasana
- Ankle Rotation
- Circle pose - Mandalasana
- Dolphin Plank Pose
- Half Frog Pose - Ardha Bhekasana
- Four-Limbed Staff Pose - Chaturanga Dandasana
- Extended Puppy Pose - Uttana Shishosana
- Supported Headstand - Salamba Sirsasana
- Pendant Pose - Lolasana
- Ankle Bending
- Wrist Bending
- Standing Half Forward Bend
- Side-Reclining Leg Lift
- Standing Yoga Seal
- Shiva Twist
- Upward Salute
- Intense Side Stretch Pose
- Wild Thing
- Great Hand Posture
- Upward Bow
- Warrior Seal
- Spread Leg Forward Fold
- Legs-Up-the-Wall Pose
- King Pigeon Pose
- Arm Pressing Posture
- Upward-Facing Dog
- Crocodile Pose
- Feathered Peacock Pose
- Reclining Angle Pose
- Reclining Hero Pose
- Half Headstand Pose
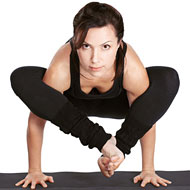
Shoulder-Pressing Pose - Bhujapidasana
The shoulder pressing pose of yoga or the Bhujapidasana is basically a yoga pose that is known to be simple however at the same time may cause some amount of pain. In due course of time with regular practice you will be able to perform this pose better as it simply requires balance, stamina, strength, will power and patience.
The shoulder pressing pose is basically an excellent pose to build up upper body and arm strength.
Related Articles
Related Blogs
Yoga Questions
Continued...
Steps :
- First you are required to squat placing your feet at a distance slightly less than the distance between your shoulders with the knees wide.
- Thereafter you should angle your torso in a forward direction placing it between the inner thighs. As you keep the torso low, the hips should be raised till the thighs become almost in line with the floor.
- Try and place the upper left shoulder and arm as close as possible to the rear of the left thigh, slightly above your knees. As you complete this, keep the left hand on the ground towards the outer edge of the left foot. The same set of movements should then be repeated with the right side which will then cause the upper back to round.
- Thereafter, pressing your hands flat on the floor, you should try and lift your weight using your hands. The lifting of the feet off the floor by straightening of the arms is on account of a shift in the center of gravity and not simply because of raw strength.
- Once done, try to press your outer arms along with the inner thighs as you place the right ankle over the left ankle and look in the forward direction. This pose should be held for 25 seconds or so and thereafter release your body back onto the floor by slightly bending your elbows and exhale.
Precautions:
- Those who are already suffering from injuries to their lower back, elbow, wrist and shoulder should not perform the shoulder press pose and it may worsen the injury.
- Similarly individual who have very high blood pressure should avoid practicing this yoga pose as it may further increase the blood pressure levels.
- Individuals suffering from cervical spondylitis should also avoid the shoulder press pose as this pose causes to neck to take the weight of the body.
- Cases have been noted wherein an individual suffering from detached retina or glaucoma has practiced the shoulder pressing yoga pose, resulting in the worsening of the condition and hence should be avoided.
Beginner's Tip:
For those who are beginning with practicing various yoga poses, they are advised to use a bolster or a yoga block to support their buttocks while attempting this pose initially. It is also necessary that if you are a beginner, you have a yoga instructor to guide you through the pose in order to avoid injury.
Benefits To Body Parts And Therapeutic Applications:
- Improves the overall sense of balance of the individual
- Strengthens the arms, upper body , shoulders and wrists
- Tones the abdomen
- The shoulder pressing pose is also known to help in nourishing the thyroid gland that performs the function of controlling the heart rate, balancing the nervous and digestive system as well as regulating the metabolism of the body.
- The shoulder pressing pose of yoga is also beneficial in increasing the circulation to the abdomen and the legs and also helps in massaging the abdominal organs besides relieving stress.
- On account of the enhanced blood flow, this asana also helps in relieving mental and emotional stress as well as headaches.
Variations:
- One Leg Pose (Eka Pada Sarvangasna)
Steps :
- In order to practice this pose, lie on your back and place your left leg such that it is perpendicular to the ground.
- Without any movement in your left leg inhale and place your right leg parallel to the ground.
- When doing this the outer hip of the right leg will move downward towards the ground and therefore you could let the right leg move in an outward direction.
- Holding your sitting bones move the right leg once again to normal and stay there for around 30 seconds.
- Inhale and place the right leg to perpendicular again, and repeat it for the left.
Preparatory Poses :
- Plough Pose (Halasana)
- Hero Pose (Virasana)
- Bridge Pose (Setu Bhndha Sarvangasana)
Shoulder-Pressing Pose - Bhujapidasana