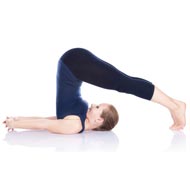
Plough Pose - Halasana
In the Plough Pose or Halasana, the body takes a shape similar to a plough. The meaning in Sanskrit derives from the word Hala or plough.
Just as a plough softens unyielding and hard ground, this pose reduces the stiffness in the body by stretching the veins.

Many people suffer from stiff necks, backs and shoulders as a result of stress and bad posture. They benefit from the plough pose because it stretches the neck and lower back muscles. It enhances the flexibility of the spine and stimulates the spinal nerves.
It is not an easy pose to accomplish initially so you should take it easy when starting off. Regular practice will help you to gradually master this pose and enjoy its benefits.
Steps
These are the steps for the Plough Pose.
- Take 2 to 3 blankets and fold them into a rectangle measuring approximately 1 foot by 2 feet.
- Stack them one on top of another.
- Lie down on the blankets with your shoulders and part of your back on the blanket but with your head touching the floor.
- Your arms should lie by your side on the floor.
- Bend your knees in such a way that your feet are flat on the floor and your heels are close to your buttocks.
- Exhale and press your arms against the floor while pushing your feet away so that your hips lift and your thighs are drawn into your torso.
- Continue to lift your pelvis and your lower back away from the floor so that your knees come towards your face.
- Bend your elbows and bring your hands up to your lower back so that the palms are flat against the back. Your upper arms should be flat on the blanket.
- Keeps raising your pelvis so that your torso is almost perpendicular to the floor.
- Slide your hands downwards without letting your elbows spread too much. Your hands should be comfortably placed to support your torso.
- Inhale and straighten your knees so that your legs are now pointed straight up towards the ceiling.
- Press your arms and shoulders into the blanket for support and try to lift your upper spine away from the floor.
- Your shoulder blades should be firm against the back and your chin should be pressed into the sternum.
- Your thighs should be in line with your torso, almost perpendicular to the ground.
- This pose is known as the Supported Shoulder Stand or Salamba Sarvangasana. Hold this pose for 30 seconds.
- You are now ready to move on to the Plough pose or Halasana.
- Slowly bend from your hip while simultaneously exhaling, bringing your legs backwards over your head, and slowly lower your toes to the floor behind your head.
- Keep your legs fully extended.
- Keeping your toes on the floor, lift the top of your thighs and tailbone upwards towards the ceiling so that your torso from the shoulders to the hip is vertical.
- Your chin should be drawn into your sternum.
- Release your hands from your back and stretch the arms out so that they are flat on the floor opposite the legs.
- You can also continue using your hands to support your back till you are confident about maintaining your balance.
- Hold this pose for between 1 to 5 minutes.
- To exit this pose, while exhaling, bring your hands onto your back and lift your legs back into the Sarvangasana pose.
- Then bring your legs and torso slowly downwards.
Precautions
Precautions for the Plough Pose include:
- Avoid jerky movements lest you injure your spine.
- The movements should be slow and gradual.
- If you suffer from and liver or spleen disorders, asthma or hypertension, then attempt this pose only under supervision of an experienced teacher.
- Pregnant women who are experienced in this pose can continue to do so late into their pregnancy. Do not attempt this pose if you have not done it before.
Avoid this pose altogether if you have any of the following conditions.
- Diarrhea
- Menstruation
- Neck injury
Beginner’s Tip
This pose is considered to be an intermediate one and as such should not be attempted by beginners unless under supervision by an experienced teacher.
Benefits to the Body
- Has a calming effect on the mind
- Stretches the spine and makes it more flexible
- Stimulates the abdominal organs and aids digestion
- Stimulates the thyroid gland
- Reduces stress and fatigue
- Helps to relieve symptoms of menopause
Therapeutic Applications
Therapeutic applications include:
- Gastric and digestive disorders
- Sinusitis
- Insomnia
- Infertility
- Backache
- Headache
Variations
Variations for Plough Pose include “Parsva Halasana” or “The Twisted Plough Pose”. This is how it is done.
- Perform the Plough Pose
- While exhaling, walk your feet as far to the left as you can.
- Try to keep the pelvis steady as one side of your hip may tend to sink lower.
- Your hips should be parallel to the floor.
- Hold this pose for between 30 seconds and one minute.
- Inhale and walk your feet back to the center.
- Repeat the process towards the right hand side.
- Release yourself from the Plough Pose.
Preparatory Poses
Preparatory poses for Plough Pose include:
- “Salamba Sarvangasana” or “The Supported Shoulder Stand”
- “Setu Bandha Sarvangasana” or “The Bridge Pose”
Follow Up Poses
Follow up poses for Plough Pose includes:
- “Adho Mukha Svanasana” or “The Downward Facing Dog”
- “Paschimottanasana” or “The Seated Forward Bend”