- Mountain Pose
- Five pointed star pose
- Goddess Pose
- Cresent Moon Pose
- Chair pose
- Warrior II Pose
- Side Angle Pose
- Triangle Pose
- High Lunge
- Revolved Side Angle Pose - Parivrtta Parsvakonasana
- Wide-Legged Forward Bend - Prasarita Padottanasana
- Lord of the Dance Pose
- Garland Pose
- Standing Split
- Revolved Triangle Pose
- Extended Triangle Pose
- Low Lunge
- Upward Forward Fold
- Big Toe Pose
- Extended Side Angle Pose
- Dolphin Pose
- Standing Forward Bend
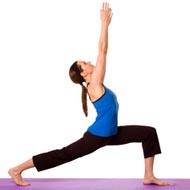
Warrior I Pose (Virbhadrasana)
Yoga is an ancient practice that originated in India. It was used primarily as a way of life by sages to achieve holistic well-being.
In recent years, yoga has become a popular exercise alternative with Hatha Yoga being practiced worldwide. Among the standing poses in Hatha yoga, the Virbhadrasana I (Warrior pose I) is a beautiful pose that inspires grace and strength.
Related Articles
Related Blogs
Related Topics
Yoga Questions
Continued...
It is a standing forward lunge in which the hips face forward and the legs are in the sagittal plane. One leg is kept forward and the other one at the back, rather than to the sides like in Trikonasana (Triangle Pose) and Vrksasana (Tree Pose).
Warrior I Pose
The yoga Warrior 1 Pose helps strengthen the shoulder muscles, spine and legs, and at the same time, it increases the flexibility in the shoulders, hips, legs and feet. Practicing this pose will stretch out your body and increase your core strength. Virbhadrasana I pose can be practiced anytime during a yoga session.
Steps
The Warrior I Pose steps are as follows:
- To begin this pose you have to first come to the Tadasana (Mountain Pose). While breathing out, move your feet so that they are at a distance of about four feet from each other. Raise your arms so that they are perpendicular to the ground. Make sure they are parallel to each other.
- Turn your left foot 60 degrees to the right and your right foot should be turned 90 degrees to the right. Let your right heel be aligned with the left heel. Breathe out and rotate your torso to the right, with your torso squared as much as possible. As the left hip point is turned forward, let the head of the left femur be pressed back so that the heel is grounded. Your coccyx should be lengthened to the ground and your upper torso should be arched back a little.
- With your left heel anchored firmly to the ground breathe out and bend your right knee over your right ankle. The shin should be kept perpendicular to the ground. Students who have more flexibility can bring the right thigh to come parallel to the ground.
- With the raising of the arms try to move your ribcage away from the arms. As the back foot is grounded, try to feel a stretch that goes up the back leg, across the chest, and belly and to the arms.
- Remain in this pose for 30 seconds to 1 minute. To exit this pose, breathe in and firmly press the back heel into the ground and straighten the right knee. Turn the feet back to normal position and release the arms while breathing out. Take a few breaths and repeat the pose on the other side.
Precautions
Warrior I Pose precautions include avoiding this pose if you suffer from high blood pressure and heart problems. Students with problems to the shoulders should keep their raised arms either parallel or a little wider than parallel to each other.
Students with problems to the neck should keep their head in a position that is neutral and not look up at the hands.
Beginner's tip
There are some beginner's tips for the Warrior I Pose that you can follow, which will allow you to perform this pose more effectively. When the front knee is bent during the pose, beginners usually tend to bend the pelvis forward, which compresses the lower back. During the performance of the second step, make sure to lift the pubis to the navel with the tailbone lengthened to the floor. While bending the knee, continue to lift and bring down these two bones while the upper rim of the pelvis is kept parallel to the ground.
Benefit to body part
Benefits to the body include:
- Strengthens the muscles of the back.
- Tones the muscles of the abdomen.
- Improves digestion.
- Strengthens and stretches the hip flexors, ankles and legs.
Therapeutic Applications
The Warrior I Pose therapeutic applications include the following:
- Improves stability, balance and focus.
- Energizes the whole body.
- Helps with sciatica.
Variations
Variations for Warrior I pose can be performed by individuals who have some physical limitation or ones who want to go deeper into the pose.
- This pose can be practiced with the arms in different positions. For instance, you can go through the steps 1 to 3 (as mentioned above), but with your hands placed on your hips. Then, when you bend the forward knee let your arms swing around to the back of your torso and clasp your hands together. Your hands should be stretched away from the back and your chest lifted. It is alright at first to squeeze the scapulas together, but make sure once you lift your chest to bring them away from the spine.
- Beginners usually find it hard to ground the back heel and lengthen the lower back in this pose. A solution to this could be to lift the back heel on a height like sand bag.
- Adho Mukha Svanasana (Downward facing dog)
- Gomukhasana (Cow-face pose)
- Parivrtta Trikonasana (Revolved Triangle Pose)
- Prasarita Padottanasana (Wide-Legged Standing Forward Bend)
- Parivrtta Parsvakonasana (Revolved Side Angle Pose)
- Supta Baddha Konasana (Reclining Bound Angle Pose)
- Upavistha Konasana (Open Angle Pose)
- Supta Virasana (Reclined Hero Pose)
- Utthita Parsvakonasana (Extended Side Angle Pose)
- Virasana (Hero Pose )
- Supta Padangusthasana (Reclined Big Toe Pose)
- Vrksasana (Tree Pose)
Preparatory Poses
Preparatory Poses for Warrior I pose include:
Using a partner
You could also perform this pose with the help of two partners of around the same height. You will also need a thick pole. As you perform the pose, your partners should stand one on each side of your torso. The pole should be held above your head with each of your partner holding one end of it. Hold onto the pole with your lifted hands and your partners and you can push the pole up till you fully extend your arms.
Warrior I Pose