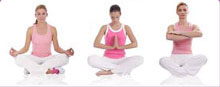
- Mountain Pose
- Five pointed star pose
- Goddess Pose
- Cresent Moon Pose
- Chair pose
- Warrior I Pose
- Warrior II Pose
- Side Angle Pose
- Triangle Pose
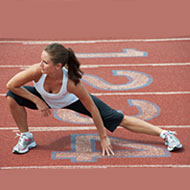
- High Lunge
- Revolved Side Angle Pose - Parivrtta Parsvakonasana
- Wide-Legged Forward Bend - Prasarita Padottanasana
- Lord of the Dance Pose
- Garland Pose
- Standing Split
- Revolved Triangle Pose
- Extended Triangle Pose
- Low Lunge
- Upward Forward Fold
- Big Toe Pose
- Extended Side Angle Pose
- Dolphin Pose
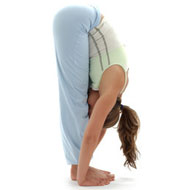
Standing Forward Bend - Uttanasana
Uttanasana is derived from the Sanskrit words ‘ut’ meaning intense and ‘tan’ meaning stretch while ‘asana’ refers to pose.
Uttanasana or Standing Forward Bend Pose is an incredible stretching yoga pose that has a number of therapeutic benefits.
Related Articles
Related Blogs
Related Topics
Yoga Questions
Continued...
In the Standing Forward Bend Yoga Pose, your head hangs below the heart allowing for fresh oxygen-rich blood to flow to your brain. This rejuvenates and revitalizes cells and gives the entire body a quick boost of oxygen. Though this is often considered a basic yoga pose, it is very important that the proper technique is followed to ensure that you stretch your hamstrings completely and do not injure your back.
Steps :
- Stand on your mat with your feet shoulder distance apart and parallel to each other.
- Press your feet down in to the floor and ground yourself strongly.
- Now exhale and gently bend down from the hips (not the waist) and place your chest and stomach on your thighs.
- As a beginner, you may have to bend your knees slightly to accomplish this.
- If your knees are bent, ensure that they are straight over your toes and not opening out inwards or outwards.
- Slowly start to straighten out your legs but make sure that your chest and stomach never leave your thighs.
- Lift your hips as you straighten through your hamstring muscles all the while pressing your heels into the floor.
- Once you feel stable, cross your forearms, grab your elbows and hang your head down.
- If you are flexible, you could try to bring your palms to the floor or hold your heels from behind.
- Begin by holding this pose for 30 seconds and gradually work your way to one minute at a time.
- As you hold the pose, gently inhale and exhale. As you inhale, lift and lengthen your torso and with every exhalation, try to go deeper and deeper into the stretch.
- Another way to extend the stretch is to roll on to the balls of your feet and lean slightly forward. This stretches the backs of your legs and allows you to hold the pose for longer.
- Do not close your eyes during this pose and you will lose your balance.
- To release the pose, place your hands back on to your hips and with a deep inhale breath, extend your back and come up to standing pose.
Precautions :
- If you suffer from any type of back injury, try this pose with your knees bent
- You can also try the Ardha Uttanasana instead of the Uttanasana if you suffer from chronic back pain
- Avoid this pose completely if you have recently had back surgery, knee surgery or surgery to your hamstrings
- Do not do this pose if there has been recent injury to your legs, hips, and shoulders
Beginner’s Tips :
As a beginner, you can bend your knees slightly as you fold over at the hips and hang your head down.
Then, very slowly, you can try and straighten your knees but never lock them back. If you suffer from chronic back pain or any type of injury, keep your knees bent as well. If necessary, you can place a yoga block or a thick book under your balls of your feet. This helps increase the stretch to your hamstrings. Never overstretch until you feel pain. Keep your upper back curled with your stomach sucked in to reduce pressure on the back muscles. As your muscles become stronger and your hamstrings more flexible, you will be able to move deeper into the stretch and hold the pose for longer. Do not rush things and always practice under the supervision of a trained yoga instructor.
Benefits to Body Parts :
- Stimulates the liver, spleen, and kidneys
- Stimulates the endocrine and nervous system
- Stretches and opens the leg muscles such as the hamstrings and calves
- Improves flexibility of the hips
- Strengthens the knees
- Improves cellular growth
- Improves blood circulation
- Strengthens the spine
- Relieves tension in the back, shoulder, and neck
- Tones and activates the muscles of the abdomen
- Improves posture and alignment
Therapeutic Applications :
- Athletes benefit from this pose as it opens up the hamstrings and allows for greater speed and mobility. Reducing back strain also lowers the risk of injury on field.
- Reduces stress and anxiety
- May help treat depression
- Reduces fatigue
- Calms the mind and soothes the central nervous system
- May help reduce problems such as indigestion and high blood pressure
- May help treat infertility, sinusitis, osteoporosis, asthma, insomnia and headaches
- May lessen the symptoms of menopause
Variations :
There are a number of variations that you can try with this pose depending on your skill and flexibility. These include:
- Hold on to the back of your ankles as you move deeper in to the stretch
- Grasp behind your heels and under your feet with all fingers pointing forwards.
- Cross your arms behind your legs and reach to the front of your ankles with opposite hands.
- Cross your arms behind your legs and hold the opposite elbows.
You can also vary the pose by partnering up with another person –
- As you practice the pose, place your buttocks against a wall for support.
- Your heels should be a few inches away from the wall.
- Bend your knees and extend forwards and downwards while your partner presses down on your sacrum.
- Slowly straighten your knees as the pressure continues.
- Hold the pose for 30 seconds to a minute and release.
Padangusthasana variation :
- Get in to the pose
- Bend forward and grasp the big toe with your index and middle finger
- Inhale and straighten your arms all the while holding on to your big toe
- Your torso will lift away from your thighs in this variation of the pose
- Keep your back as concave as possible
- Hold the pose for a few seconds
- Exhale and drop slowly down and forward once again with your arms to your sides
Preparatory Poses :
- Downward Dog Pose (Adho Mukha Svanasana)
- Head to Knee Forward Bend (Janu Sirsasana)
- Seated Forward Bend (Paschimottanasana)
- Reclining Big Toe Pose (Supta Padangusthasana)
Follow Up Poses :
- All standing poses
- Inversions
- Seated Forward Bends
Standing Forward Bend