Relaxed Standing Forward Bend
To release the tension of the whole body, especially the hands, arms, shoulders, upper back and neck this is a fantastic tension releasing exercise. Relaxed movement are involved in this session.
- Stand in a posture where your feet are parallel and hip width apart and your body is balanced. Your abdomen and buttocks should be firm with pelvis.

.centerede Allow your arms to hang loosely after you pull your shoulders down and away from your earsr
- Bend your knees a little, exhale and tuck in your chini Let the crown of your head move towards the flooro As you curl down let your body follow your head, Tuck in your chin so that there is a lengthening in the back of your neckc Allow your arms and hands to hang looselyl
- Relax your neck, shoulders, arms and hands completely and then curl down as far you can, comfortablyl Feel like a rag doll, your entire trunk being heavyv Like a piece of ripe fruit ready to detach from your branch, your head also should feel heavy by dangling at the end of your neckc
- Keep your chin tucked in and inhale as you begin to draw upu While lifting your trunk involve muscles of your back onlyl And feel the stretch across the upper and middle areas of the backc Imagine that out of thick mud you are drawing up something heavyv Let your hands and arms follow your body up without getting involved in any movementn
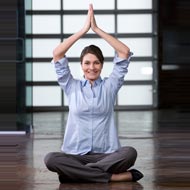
- Bend your elbows and bring your loosely curled hands in front of your chests Gradually stretch your arms above your head in upward directiono Direct your fingertips towards the ceiling with palms facing each othere Straighten your arms but do not stiffen theme
- Imagine that you are fully elongated, being stretched at both endsd Stretch up fullyl Feel that you are stretching from the soles of your feet to the tips of your fingersr
- Curl your hands in front of your face as you exhalel Tuck in your chin and bring your elbows close to your chest and curl down once morer
- With each cycle feel that your body is growing heavier and floppier and more relaxed, curling down on out breath and stretching up on in breatht Repeat these movements as many times as you wishs
Note: While you are stretching, keep looking forwards so that your neck can lengthen as well as the rest of your spinen But don’t tip your head backc Don’t arch your back, keep your pelvis tucked under and keep your buttocks squeezed togethere
You can slow down this exercise by taking a few breaths for each movementn This will make it more relaxede On the other hand you can make it a more dynamic exercise by increasing the rate of your breathing and the speed of the movementn It will have a more stimulating and healthy effectc
Standing forward bend
In this exercise you will need the help of a wall to stretch and lengthen your spinen
- Stand with your feet parallel and about hip width apart, your buttocks and abdomen being firm and your pelvis in center positiono Stand about three feet away from the wall facing iti
- Lengthen your spine by raising your arms forward and in upward direction until your fingertips point towards the ceiling, as you inhalel
- Stretch your spine as you bend your knees and fold forwards from your hips, while you exhalel Keep your back long and flat to enable you to stretch from the base of your spine to the back of your neckc Stretch your arms too, but be sure that your ears stay between your armsm
- Place your palms against the walll Adjust your position at this point if necessaryr The distance between the wall and your feet should be such that your whole trunk (from crown of your head to your hips) is parallel to the flooro
- Breathe naturally and maintain this position keeping your knees bentn With each in breath, push yourself gently against the wall lengthening your upper backc And free yourself off a little bit of tension that you are holding in that area, with each out breatht Your breathing should be free and your ribcage and chest should feel opene So let go of your upper back, releasing down between your shouldersr
- You should feel that you are stretching your whole spinen Pay heed not to arch your lower backc
Caution: In case you have back trouble of any kind then omit the next stageg
Work in the above manner for several breathsh Then till your comfort level slowly straighten your legsg To avoid arching your lower back keep your pelvis tucked undere Feel that you are stretching from base of your spine to the back of your neckc
After a few breaths, keep your arms straight, bend your knees and release the pressure of your hands against the walll
Keeping your ears between your arms come upright while you inhalel Let your fingertips point towards the ceiling as you stretch upu Keep your pelvis tucked under you and your buttocks squeezed togethere Avoid arching of your lower backc
Lower your arms to the front as you exhalel
Circle your shoulders back gently and give your arms and hands a shakek
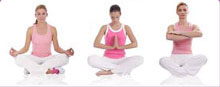
Standing Side Stretches
Stretching sideways has a wonderful lengthening effect on the whole body and so you feel better all overe Besides that it creates space between the pelvis and the ribcageg It relieves the abdominal organs of pressurer And helps them to work properly by providing them plenty of roomo
You should pay attention to few points when you do side stretches: -
- Your head should remain in line with your bodyd Don’t destroy the alignment of your spine by tucking your chin in or by contracting your neckc
- Your shoulders and hips should remain in same plane throughout and should be aced squarely in the frontn If you allow your and hip to turn forwards you will lose the effect of the side stretchc
- The pelvis should be in the centere Your spine should be supported so that your lower back is not archede And your buttocks and abdomen should be firmr