Locust Pose - Salabhasana
Among the 12 basic Hatha yoga postures, Locust Pose (Salabhasana) is the seventh of them. It is also the second of the three exercises for strengthening the back.
'Shalabha' is a Sanskrit term which means 'grasshopper' or 'locust'.

Locust pose
The Salabhasana (Locust Pose) is a stretching pose that focuses on the abdomen, thorax, and the upper and lower back. The primary benefits of the yoga Locust Pose are to build flexibility and strength in the back. This pose is a counter-stretch to Paschimothanasana (Seated Forward Bend), Plough Pose (Halasana) and Sarvangasana (Shoulder Stand). Before you start the Locust pose, the resting pose is performed by lying down on the stomach rather than the back.
Steps
For the performance of this pose you may want to pad the ground below your ribs and pelvis with a folded blanket. The Locust Pose steps are as follows.
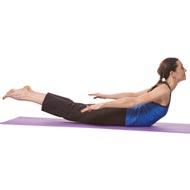
- To begin this pose, you should come to the lying position with your belly on the floor. Keep your arms at the sides of your torso, forehead resting on the ground, and your palms up. Your big toes should be turned inward so that your thighs are rotated. Keep your buttocks firm so that your coccyx is pressed to the pubis.
- Breathe out and raise your head, legs, arms, and upper torso away from the ground. You will be resting on your front pelvis, belly, and lower ribs. Make sure that your buttocks are firm and stretch out your legs. Let the big toes remain turned toward each other.
- Raise your arms so that they come parallel to the ground and actively stretch them backwards. Imagine there is a weight pushing down on your upper arms and push up against this resistance. Your scapulas (shoulder blades) should be pressed into your back.
- Look either directly forward or a little upward and be careful not to push your chin forward or put pressure on the nape of your neck. The base of your skull should be lifted and the back of your neck should be kept long.
- Remain in this pose for 30 seconds to a minute and release with an exhalation. You can take a few breaths and perform the steps 2 to 3 more times if you feel like it.
Precautions
The Locust Pose is a great yoga posture, but is not considered practical for most individuals as a posture for meditation. It puts a lot of stress on the hip joints and knee and should be approached with care, especially by beginners. Some of the Locust Pose precautions include avoiding this pose if you have injured or weak knees as a lot of stress is put on the knees. Also, refrain from practicing this pose if you have sciatica. You should also avoid this pose if you have an injury to the ankle.
Beginner's tip
Practicing the Locust pose in a correct manner can provide a lot of benefits. Therefore, make sure to follow all the instructions and tips during your practice. A good beginner’s tip for Locust Pose is to concentrate on the lengthening of the spine. It’s not important how high you lift up. Putting too much emphasis on the height can put a strain on your neck and back and cause injury.
You can rotate your thighs inward by making your big toes turn towards each other. This will prevent too much lower back compression. Your pelvis should be drawn firmly to the mat. This will enable a better lift of your upper body. Your buttocks should be kept firm, but not hard. You could make use of the back and abdominal muscles to lift yourself in the pose. You should always perform the pose on a mat or blanket and never on bare ground.
Benefits to the body
Benefits to body include:
- Strengthens the muscles in the lower back.
- Improves flexibility in the back.
- Particularly recommended for relieving lower back pain and sciatica.
- Massages to the internal organs.
- Improves digestion.
- Strengthens the shoulders and arms.
Therapeutic Applications
The Locust Pose’s therapeutic applications include the following:
- Improves concentration.
- Stimulates the swadhisthana chakra.
- Improves digestion.
- Deals with fatigue.
Variations
- One of the challenging variations for Locust Pose is the Makarasana (Crocodile Pose). Here, the legs are also lifted along with the arms. However, the fingers are held together and the palms are placed at the back of the head. The index fingers are put under the base of the skull.
- To challenge your flexibility and strengthen your back further, you could extend your arms to the sides and raise them up like you are lifting and spreading wings.
- Advanced practitioners can challenge themselves with another variation. Rather than making the legs stretch back from the pelvis you could bend your knees and keep the shins perpendicular to the ground. Then, as you raise the arms, head and upper torso, raise the knees as far away as possible from the floor.
Preparatory Poses
The Preparatory Poses for locust pose include:
- Bhujangasana (Cobra Pose)
- Gomukhasana (Cow-face Pose)
- Setu Bandha Sarvangasana (Half Wheel Pose)
- Supta Virasana (Reclined Hero Pose)
- Urdhva Mukha Svanasana (Upward Facing Dog)
- Virabhadrasana I (Warrior Pose I)
- Virasana (Hero Pose )
Follow up poses
The Follow up poses for locust pose includes the following:
- Bharadvajasana (Bharadvaja's Twist)
- Salamba Sarvangasana (Shoulder stand Pose)
- Setu Bandha Sarvangasana (Half Wheel Pose)
Working with a partner
Making use of a partner can help you work the back part of the upper arms. Your partner should stand next to your torso while you practice the pose. Your partner should then come forward and place his or her arms on the backs of your upper arms. You should then push upwards against the resistance.
Adding more repetitions when performing the Locust Pose will help lengthen, strengthen and revive your body. However, it is best to perform this pose under the guidance of a practitioner (or partner adept in yoga) to avoid injury.